Monster information
This section contains information about every monster in game. The level ranges given are the lowest and highest levels of the monsters on the corresponding map. You do not necessarily have to be within the level range to hunt or explore there, but it is recommended that you are.
- Juno monsters - level 1-30, Boss Raid
- Belfist Temple monsters - level 10-25
- Personal Dungeons monsters - level 7-48
- Ebony Mine monsters - level 123-140
- Dratan monsters - level 20-64, Boss Raid, Elemental Boss
- Procyon Shrine monsters - level 17-29
- Temple of Forgetfulness monsters - level 65-77
- Teo's Tomb monsters - level 100-110
- Theo's Darkness monsters - level 190-195
- Merac monsters - level 28-51 and 105, Boss Raid, Elemental Boss
- Maargadum Jail monsters - level 40-52
- Misty Canyon monsters - level 124-140
- Egeha monsters - level 60-90, Boss Raid, Elemental Boss
- Akan Temple (normal) monsters - level 64-70
- Akan Temple (hard) monsters - level 93-99
- Lust Trum monsters - level 87-105
- Floraim Cave monsters - level 125-140
- Bloodymir monsters - level 107-129
- Streiana monsters - level 106-120, Elemental Boss
- Trivia Canyon monsters - level 119-136
- Mondshine monsters - level 140-156, Boss Raid
- Chapel monsters - level 152-163, Elemental Boss
- Altar of Darkness monsters - level 160-175
- Tarian monsters - level 160-176, Boss Raid, Elemental Boss
- Ramslo's Underground Laboratory monsters - level 179-187
- Alber monsers - level 177-185
Name colors and experience
The colors of monster names give a general indication of their level. Here is how the name color scale works:
| ≤ -10 | -9 | -8 | -7 | -6 | -5 | -4 | -3 | -2 | -1 | You | +1 | +2 | +3 | +4 | +5 | +6 ≤ | |
|---|---|---|---|---|---|---|---|---|---|---|---|---|---|---|---|---|---|
| Blue | Green | White | Yellow | Red | |||||||||||||
| EXP | 10% | 10% | 10% | 10% | 10% | 45% | 60% | 75% | 90% | 95% | 100% | 100% | 100% | 100% | 100% | 100% | 100% |
| SXP | 1 spx | 10% | 20% | 30% | 40% | 50% | 60% | 70% | 80% | 90% | 100% | 100% | 100% | 100% | 100% | 100% | 100% |
As you can see, monsters 6 or more levels below you have blue-colored names; monsters 3-5 levels below have green-colored names; monsters within 2 levels of you have white-colored names; monsters 3-5 levels above you have yellow-colored names; and monsters 6 or more levels above you have red-colored names. You may sometimes hear of orange-named monsters, but these are the same as yellow-named ones. The exact color of the names monsters 3-5 levels higher than your character seems to depend on your computer screen. Officially, they are known as being yellow-named, so that is how they will be referred to here.
Monsters that are the same level as you or higher will give you 100% EXP ans SXP. Monsters that are lower level than you have a EXP and SXP penalty, which increases with every level of the difference. Monsters that are 10 or more levels lower than you will give only 10% of base EXP and 1 SXP point.
When you kill monsters, the amount of EXP and SXP you receive differs from kill to kill. The values range from 91% to 110% of a base. The EXP and SXP amounts shown on the pages in this section are the maximum amounts (110%) you may receive from each monster as long as it is equal to or above your level. To receive the maximum EXP and SXP every single kill, you must be in a Fellowship. Additionally Fellowship increases experience gain to 130% of the base, while the skill experience remains at 110% of the base.
All experience and skill experience points were determined without any boosts or Dungeon Timer bonus.
MONSTER LISTS
For each monster this information is given:
Name of the monster
Level
Type of Monster – Normal, Elite or Boss, more info below
Level
Type of Monster – Normal, Elite or Boss, more info below
|
Health points (values are taken from old guide)
Elemental Attack and Defense information |
Behavior vs player and pets – is it passive or aggressive
Attack type – physical or magical, close or long-range |
|
Experience
Experience (F) Skill Experience Pet Experience Affinity |
– maximum experience that player can gain without any kind of party or boosts
– experience in Fellowship, maximum experience player can gain in solo play – maximum SXP player can gain (with or without party/fellowship) – EXP gained by P2 pet – type of affinity system the monster belongs to and the number of points |
Skill
|
– if the monster has one, including type of skill (attack, debuff, self-buff) and description.
|
Instead of listing debuff cures inside the monster information pages, like it used to be the case in the old guide, the type of debuff is given next to the skill name.
| Type of debuff | Cure |
|---|---|
| snare | (Advanced) Potion of Escape, Owl’s Tablet of Condition Recovery |
| poison | (Advanced) Antidote, Owl’s Tablet of Condition Recovery |
| bleed | (Advanced) Hemostatic, Owl’s Tablet of Condition Recovery |
| stone | (Advanced) Potion of Cure Stone, Owl’s Tablet of Condition Recovery |
| blind | (Advanced) Potion of Cure Blindness, Owl’s Tablet of Condition Recovery |
| stun | (Advanced) Remedy, Owl’s Tablet of Condition Recovery |
| silence | (Advanced) Potion of Cure Silence, Owl’s Tablet of Condition Recovery |
| sleep | Owl’s Tablet of Condition Recovery or wait till other monster hits you |
| debuff - all other debuffs | Owl’s Tablet of Condition Recovery |
TYPES OF MONSTERS
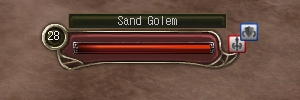
Normal monsters, which can be killed without much trouble if you are close to their level. You can recognize them by a simple frame around their name.
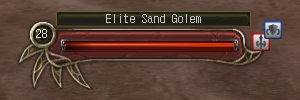
Elite monsters – they have more attack, defense and health points than their normal counterparts. You can recognize them by a spiky frame around their name.
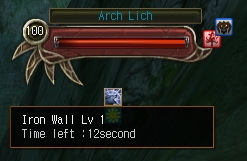
Boss monsters – monsters with increased attack and defense augmented with elemental powers. They often have unique skills and debuffs. Just like elite monsters bosses have a spiky frame around their name (though there are a few exceptions).
There are two major differences that set them apart from elites:
Iron Wall activates, when you debuff the monster - at the moment only few skills trigger it. This can happen up to four times during single fight. Each time the duration of the wall increases: level 1 - 20 seconds, level 2 - 35 seconds, level 3 - 50 seconds, level 4 - 60 seconds. After activating Iron Wall level 4, the boss won't use the ability again, even if you keep debuffing it.
There are two major differences that set them apart from elites:
- they give more affinity points and 4x more P2 pet experience than other monsters of the same level
- they have a special ability called Iron Wall which makes them immune to crowd control effects
Iron Wall activates, when you debuff the monster - at the moment only few skills trigger it. This can happen up to four times during single fight. Each time the duration of the wall increases: level 1 - 20 seconds, level 2 - 35 seconds, level 3 - 50 seconds, level 4 - 60 seconds. After activating Iron Wall level 4, the boss won't use the ability again, even if you keep debuffing it.
Boss Raid monsters – special type of boss monster that doesn’t spawn in a fixed spot, but roams over entire map. Boss Raids don’t have Iron Wall ability. More detail here.
Elemental Boss monster – level 185 bosses that can be summoned in specific places on map by destroying a special object. More detail here.
Elemental Boss monster – level 185 bosses that can be summoned in specific places on map by destroying a special object. More detail here.
